April 4, 2020
Oh, Yeah! Ollas!
Question:
I'm getting ready for a growing season in Santa Fe. I have read about burying a clay pot as a way to water plants and not larger areas. Do you recommend this method?
- Luis G., Santa Fe
Answer:
Yes; good idea! One of my favorite irrigation mantras is “low and slow,” meaning we want water to percolate deeply. In order to do that, it needs to be applied slowly so it has a chance to sink in instead of just running off.
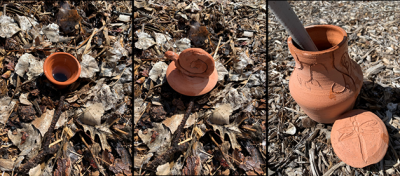
Irrigation ollas are unglazed clay vessels that are partially or mostly buried so that, when filled, allow water to seep slowly out into the soil for plant root absorption. The olla opening is exposed above ground (left) with a cap to keep bugs and other critters out and to limit evaporate from the top (center). Before they're buried (right), ollas resemble urns, and available sizes vary considerably. Filled on a Monday, these ollas still had a few inches of water in them two days later. These ollas are part of a demonstration plot in our Learning Garden at the NMS Agricultural Science Center at Los Lunas, and they are placed in the root zone of a young Texas red oak tree. In a vegetable bed, the seeds or transplants will likely need to be planted very close to the buried olla in order to access the water. These ollas were graciously created and donated by kind growers at the Valencia Community Gardens in Tome, NM. Photo credits: M. Thompson.
One way to do this is to have an irrigation system with drip emitters that release 1/2 or 1 gallon per hour. Another is to regulate the water pressure on your garden hose and let water trickle out for 15–30 minutes or more before moving the hose to another spot. (My first gardening gig was watering the plants around my apartment building for a discount on my rent. I flooded the basement apartments—not once but twice—by leaving the hose unattended for too long. So set a timer!)
But the buried clay pots you’re referring to are called ollas, and they provide several benefits in our semi-arid gardening work. An olla is, according to Merriam-Webster.com, “a large bulging widemouthed earthenware vessel sometimes with looped handles used (as by Pueblo Indians) for storage, cooking, or as a container for water.” Unglazed—and this detail is important—they are porous, and when buried, they allow the water to slowly seep out directly into the plant root zone.
I see two drawbacks that both need to be addressed. First, in my experience the soil area saturated by a seeping olla is relatively small. (Note: I haven’t tested the saturation area in an experimental setting yet and will keep readers posted when I do.) From what I can tell, seeds and transplants will need to be planted right up close to the olla in order for their roots to access the water. This is affected by soil type. Sandier soils drain faster, and the water will tend to move downward more than out laterally. In heavier clay soils, the water will have the chance to move more laterally, but oversaturation for extended periods of time should be avoided. In a container planting with limited space, ollas can be wonderfully effective (more on this later). Because the area that gets saturated is relatively small, several ollas may be needed for larger planting spaces. This brings me to drawback number two: price. Many ollas sold at garden centers are made locally by hand. They are carefully crafted, beautiful clay vessels that require skill and time to make. The larger the olla, the greater the potential watering area, but also the greater the cost. Purchasing 20 ollas for a medium-sized vegetable garden may not be feasible. Of course, many gardeners would love to receive an olla as a gift, myself included.
My esteemed predecessor, Dr. Curtis Smith, is an olla fan, and he encouraged me to try making my own olla alternative out of supplies I mostly already had at home. Take two clay, unglazed terra cotta pots of the same size. In the first pot, fill the drainage hole using silicone caulk. Along the outer rim of both pots, apply a ribbon of caulk. Fit the two pots two together to form a nice seal between them. Let the caulk dry and “voila!”—you have a makeshift olla. Bury the vessel with the sealed hole down and the open hole at the top, slightly above the soil surface. However, I found that it was a real pain to fill the vessel through that tiny top hole. So, I added a third clay pot by sealing the bottom of it to the top of the pot with the open hole and left that top pot wide open. This way I could water using a hose or watering can and the water would slowly drain into the vessel. Sometimes I had to use a stick to encourage bubbles to come up and let the vessel air out. Both of the ollas I made seemed to work well for two years before the silicone seals started to fail. I made nifty videos of this process and took lots of photos; find them on my blog this week at Desert Blooms Blog. Know what I call the mess that’s left over from a craft project? The craftermath.
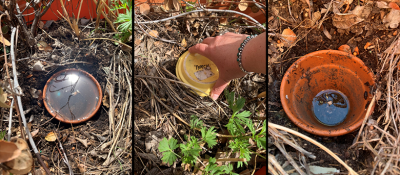
I plugged the drainage hole on this unglazed terra cotta pot to test as a simple olla in a large container at home. It was very easy to fill (left). An inverted saucer makes a great cap to keep critters out (center). It took two days for most of the water to seep out (right). Photo credits: M. Thompson.
I tested the four ollas we have in the Learning Garden at the NMSU Agricultural Science Center at Los Lunas that were graciously made and donated by wonderful people at the Valencia Community Garden in Tome last year. I filled them with a hose on Monday and when I checked back on Wednesday, there were still a few inches of water in each one. They each have a cute clay cap to keep bugs out and reduce evaporation.
Another method is to simply bury an unglazed clay pot almost to the rim (after plugging the drainage hole) and use an inverted saucer as a lid. I tried one yesterday, and as of this morning there was still some water in the bottom, so it seems to have worked!
While watering plants on a quiet morning at an Albuquerque nursery years back, a customer who was checking out our sales display of ollas called out to me, “Do you have experience gardening with these olas?” Now, normally I’d never correct a customer’s pronunciation so abruptly, if at all, but without thinking I called back, “Ollas!” Immediately I cringed at my poor customer service skills. To my surprise, she replied, “Good! What can you tell me about them?” She thought I’d said “Oh, yes!” Luckily, we had an olla buried in a little landscape demonstration nearby, so I showed her what they look like once they’re installed and how to fill them.
I have a mini gardening conundrum at my house and I think ollas might be the cure. My front and back yards are watered on an irrigation system with three zones. The front yard is one zone, the back yard is zone two, and zone three is designed for containers surrounding my back patio area. The design is good for me because I can irrigate my perennial trees and shrubs for 60 minutes on zones one and two infrequently (depending on how hot it gets and how quickly the soil dries out between irrigations), and I can set zone three to come on for just a few minutes once or twice a week to water my more water-loving containers plants. Soil in containers tends to dry out quicker than when in the ground. Of course, I’m a mulch lover and I use woodchip and leaf litter mulch all around the yard and in containers.
Anyways, the problem I’m trying to solve is that I’d like to add a few large containers out front with flowers and ornamental grasses, but they would be in irrigation zone one, which isn’t watered often enough to keep the containerized plants from drying out. I’m going to install my homemade ollas in those containers and rig the irrigation tubing to autofill the ollas when my front yard trees and shrubs get watered. Think it’ll work? Stay tuned!
Marisa Y. Thompson, PhD, is the Extension Horticulture Specialist, in the Department of Extension Plant Sciences at the New Mexico State University Los Lunas Agricultural Science Center, email: desertblooms@nmsu.edu, office: 505-865-7340, ext. 113.
Links:
For more gardening information, visit the NMSU Extension Horticulture page at Desert Blooms and the NMSU Horticulture Publications page.
Send gardening questions to Southwest Yard and Garden - Attn: Dr. Marisa Thompson at desertblooms@nmsu.edu, or at the Desert Blooms Facebook page.
Please copy your County Extension Agent and indicate your county of residence when you submit your question!